Have you ever noticed a strange odor coming from your washing machine? Or maybe your freshly washed clothes have black specks or lint stuck to them? If you’re unsure how to fix these issues, you’re not alone! These problems are often caused by black mold growing in the washing machine drum or debris clogged in the drain filter. In this article, we will introduce ways to clean your washing machine easily as well as some recommended cleaning products.
At Village House, we offer over 1,000 affordable properties all across Japan. If you’re looking for a new place to call home, be sure to check out our website!

Cleaning the washing machine lint filter

The lint filter in a top-loading washing machine catches lint and dust generated during washing. If not cleaned regularly, it can get clogged, causing dirt to reattach to your laundry. Since it can even lead to a breakdown of the washing machine, it’s better to remove lint after every wash.
▶ Tools required for cleaning
- Old toothbrush
- Bucket
- Bleach
▶ Cleaning steps
①Remove the lint filter
First, turn off the washing machine and carefully remove the lint filter from the side of the drum. There are two main types of lint filters: net-type and plastic-type. Be sure to check your washing machine’s user manual for instructions on how to remove it correctly.
② Remove debris
When the lint filter is dry, use your hands or an old toothbrush to remove lint and dust. For net-type filters, turning them inside out can help remove the debris more effectively. Since debris is easier to remove when dry, it’s better to clean the filter after it has dried rather than immediately after washing.
③ Rinse and soak with water
Fill a bucket with water and soak the filter. While it’s submerged, gently scrub off any dirt using a toothbrush. Net-type lint filters are especially prone to mold buildup, so it’s a good idea to soak them in water with a mild bleach solution regularly to keep them clean.
④ Dry and reinstall
After cleaning, make sure to dry the lint filter thoroughly. A damp filter is an ideal environment for mold to grow, so be sure to let it dry completely before putting it back in place.
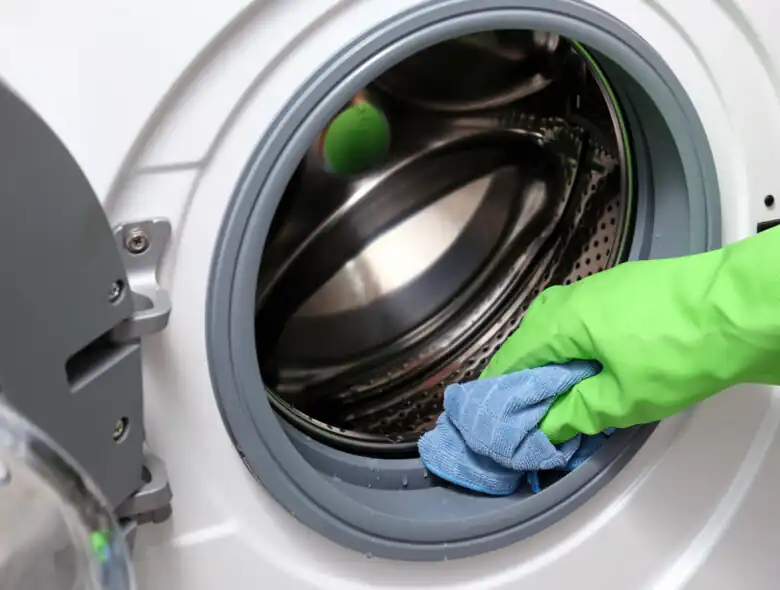
Cleaning the washing machine drain filter

Image Source: Panasonic
The drain filter in a front-loading washing machine catches lint and debris that comes out during the wash cycle. If you neglect to clean it regularly, it can lead to clogged drainage, mold buildup, and even dirt reattaching back onto your laundry. Therefore, it is recommended to clean the drain filter once a week as a general guideline.
▶ Tools required for cleaning
- Bathroom cleaning solution (chlorine-based mold remover is recommended)
- Old toothbrush
- Cleaning cloth
▶ Cleaning steps
① Preparation in advance
When removing the drain filter, there is a possibility that water may spill. Place a cloth or a bucket around the washing machine to prevent mess.
② Drain water from the filter
To prevent water from spilling when removing the drain filter, select the “spin” cycle on your washing machine and run it for 1-2 minutes to drain any remaining water from inside the filter.
③ Remove the drain filter
While the washing machine is still powered on, turn the knob on the drain filter to remove it. Some water may still leak out, so use a cloth to catch any spills while removing it.
④ Remove debris from the drain filter
Remove any lint or debris trapped in the drain filter by hand. If the dust or dirt has hardened, soak it in lukewarm water (45-50°C) to soften it, which will make it easier to remove.
⑤ Clean the drain filter
Apply the bathroom cleaning solution to the drain filter and scrub it with an old toothbrush. For mold or stubborn dirt, soak the filter in a solution of lukewarm water with an appropriate amount of bleach for 15 to 30 minutes to effectively remove the buildup.
⑥ Clean the inside of the washing machine filter compartment
Dirt can also accumulate inside the washing machine after removing the filter. Use a toothbrush to clean out any dust or debris, then scrub the area with bathroom cleaning solution. To prevent water or detergent from spilling onto the floor, keep a cloth or bucket nearby.
⑦ Reattach the filter
Once cleaning is complete, securely reattach the filter to its original position. Note that if the filter is not installed properly, the washing machine panel will display an error message.
⑧ Operation check
Run a quick rinse and a spin cycle to ensure the washing machine is functioning properly. If everything is working correctly, the drain filter cleaning is complete.
Cleaning the washing machine detergent dispenser

Since detergent and fabric softener come into direct contact with the detergent dispenser, detergent residue, mold, slime, and other dirt can build up over time if left uncleaned. To prevent this, it’s recommended to clean the dispenser once a month.
▶ Tools required for cleaning
- Bathroom cleaning solution
- Old toothbrush
- Cleaning cloth
▶ Cleaning steps
① Pour lukewarm water
Pour 100ml of lukewarm water into both the detergent and fabric softener dispenser and let it sit for about 15 minutes. This helps loosen any residue buildup and dirt. If the fabric softener tray is removable, take it out for easier cleaning.
② Scrub the dispenser
Wipe off the loosened dirt with a cleaning cloth to remove any hair or dust on the surface. Then, apply a small amount of bathroom cleaning solution and scrub off the dirt with a toothbrush. For hard-to-reach spots, using a cotton swab can be especially helpful.
③ Rinse with lukewarm water and wipe it clean
Once the dirt is removed, pour lukewarm water over the area and wipe it clean with a damp cloth. After draining the water, the cleaning process is complete. If you’re unsure whether the water is draining properly, you can run an empty wash cycle to check.
Cleaning the washing machine drum

Image Source: Daiya Official Website
Over time, the washing machine drum accumulates dirt from clothing, as well as leftover detergent residue. The proliferation of black mold and bacteria inside the drum can cause unpleasant odors and even lead to dirt reattaching back onto your laundry. Thus, it is recommended that you clean the washing machine drum once every 1-2 months.
▶ Tools required for cleaning
- Commercially available chlorine-based bleach or a washing machine cleaner
- Lint-scooping net
▶ Cleaning steps (for machines without a drum cleaning cycle)
① Fill with lukewarm water
To help loosen dirt, fill the washing machine drum with 40–45°C lukewarm water until it is fully submerged. Once the water is in, run the machine for about 5 minutes.
② Add detergent to lift dirt
Pour an enzyme-based bleach into the warm water. As the detergent reacts with the hot water, it will start to fizz and create foam. Run the washing machine for about 15 minutes to ensure the solution reaches every corner of the drum.
③ Soak for 2-3 hours
After running the washing machine for 15 minutes, stop the cycle and leave to soak for at least 2-3 hours. If you are particularly concerned about the smell of the washing machine or heavy dirt buildup, soaking for up to 5 hours is recommended for better results.
④ Scoop out floating dirt
After soaking, run the washing machine again for about 10 minutes. If any brown or black residue floats to the surface, use a lint-scooping net to remove it.
⑤ Rinse and spin until clean
Once the debris has been removed, run the washing machine in spin mode to drain the water inside. Then, refill with clean water and run another wash cycle. If dirt or residue still floats to the surface, scoop it out and repeat the process until no more debris appears.
▶ For machines with a drum cleaning cycle
If your washing machine has a drum cleaning cycle, fill the drum with 40–45°C lukewarm water as mentioned earlier. Then, add a chlorine-based bleach or a washing machine cleaner and simply start the drum cleaning cycle.
Recommended Cleaning Supplies
There are two types of washing machine cleaners: enzyme-based and chlorine-based.
Enzyme-based washing machine cleaning solutions contain sodium percarbonate, which creates a strong foaming action that helps lift stubborn dirt and residue. If you clean your washing machine frequently, an enzyme-based cleaner is recommended.
Meanwhile, chlorine-based washing machine cleaning solutions are mainly composed of sodium hypochlorite, which has strong disinfecting properties that effectively break down and remove mold. If you want to get rid of mold and tackle unpleasant smells, a chlorine-based washing machine cleaner is recommended.
▶ Recommended enzyme-based cleaning solution

Image Source: OXI CLEAN
Oxi Clean’s “Washing Machine Cleaner” creates oxygen bubbles inside the washing machine drum, effectively breaking down dirt and odors. It is compatible with various types of washing machines, including drum and top-loading models. Additionally, it comes in pre-measured single-use packets, which makes measuring easy and convenient.

Image Source: Shabondama Soap
Shabondama Soap’s “Washing Machine Drum Cleaner” combines additive-free soap and baking soda to effectively lift and remove black mold and dirt hidden on the inside of the washing machine drum.
▶ Recommended chlorine-based cleaning solution

Image Source: LEC Official Website
LEC’s “Gekiochikun Ultra-Powerful Washing Machine Drum Cleaner” contains highly concentrated chlorine-based ingredients that powerfully break down black mold and dirt. It is also compatible with top-loading, drum, and twin-tub washing machines and contains anti-rust agents, making it safe for use on stainless steel drums. Additionally, since it can be cleaned in a short time using the washing machine’s standard wash cycle, it is recommended for those who want a quick cleaning.
▶ Washing machine drum debris-scooping net

Image Source: Daiya Official Website
This specialized net is designed to effectively scoop out mold, sebum stains, detergent residue, and other debris that accumulate when cleaning the washing machine drum. Made with fine mesh fabric, it catches even the smallest debris, while its long 39 cm handle allows you to reach the bottom of the drum without getting your hands wet.
After use, you can remove the net and throw away the debris as it is, so it can be kept clean. In addition, commercially available stocking-type drain nets (shallow type) can be used as replacement nets.
At Village House, there are no security deposit, key money, handling fees, or renewal fees(※). If you’re looking to save on initial costs and renewal fees, feel free to contact us!
※ Depending on the screening results, a security deposit may be required.
Related articles:
- Living Alone as a College Student – The Most Common Problems and How to Deal with Them
- Bathtub Troubles: How to Remove Clogs
- Caring for Your Tatami: A Beginner’s Guide
- Cleaning Your Kitchen
- Useful Cleaning Tools

Hello, I’m Machiko Doi, a freelance writer who writes about housing and living in Japan.
I live in an 80-year-old house that I inherited from my grandparents along with my two shelter cats and daughter.
We live a relaxed life while repairing the house.
I like to cook vegetables from the garden and fresh fish caught by my father, and enjoy them with cold beer on a hot day or hot sake on a cold day.